
All of Create: Aeronautics is the definitive Create experience for Minecraft 1.21.1, packing 50+ Create addons into a single, performance-optimized modpack built around the Create: Aeronautics mod. Design and pilot functional airships, build automated factories, lay railway networks, and engineer flying contraptions limited only by what you can imagine. With a quest system guiding progression and over 438K downloads, it's one of the most polished Create-focused packs available. Getting a server running for it is straightforward. Here's how to do it.
Before you get started
Hosting a modded server on your own PC is free but comes with three trade-offs worth knowing up front.
- It's only online while your PC is on
- All of Create: Aeronautics needs 6–8GB of RAM plus a good CPU, and that's before you've joined yourself. Create mods are CPU-heavy due to contraption physics, so a decent processor matters more here than in most packs
- Letting friends join requires opening a router port, which can expose your network if you're not careful
None of this is a dealbreaker, but it's worth knowing now rather than mid-setup.
All of Create: Aeronautics server hosting
If that sounds like more than you want to manage, using a Minecraft hosting provider skips all three. If you haven't already, purchase a modded server with WiseHosting to get started, then follow the instructions:
- Head to your WiseHosting game panel and locate the Version tab
- Choose Modpacks and select CurseForge from the dropdown filter
- Search for All of Create Aeronautics and click Install
- Click Start to start your server
- Copy the IP and join the world
Your server is live in under two minutes, stays online 24/7, and never touches your home network.
If you still prefer to set up an All of Create: Aeronautics server yourself, keep reading.
1. Download the All of Create: Aeronautics server pack
If you don't have the CurseForge app yet, download it first. You'll need it to install the modpack on the client side.
Search for "All of Create: Aeronautics" this is the modpack for the Create Aeronautics mod.
Open the modpack page and click on the "Download server pack" button. The file is named Aoc_Aeronautics_vX.X_serverpack.zip. Save it to a dedicated folder on your PC.
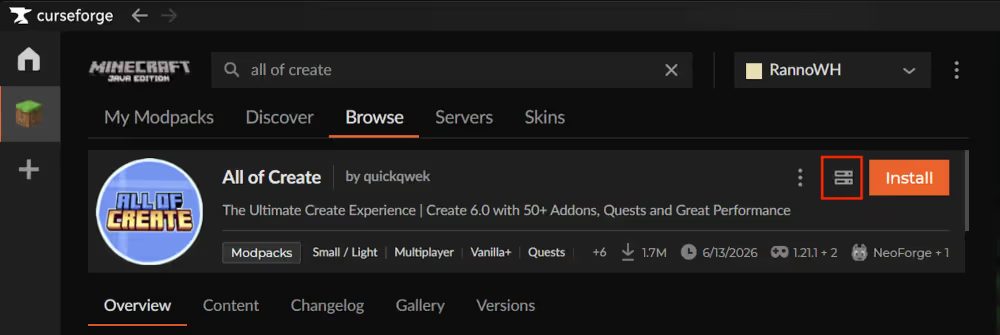
By default on the modpack page the "download serverpack" button gets you the latest version of the modpack. For a completely new install I'd go with the latest release.
Create a server folder and extract the files
Create a new folder somewhere easy to find like your desktop. Name it something like "AOCServer". Extract the downloaded zip and move everything from the extracted folder into your new server folder.
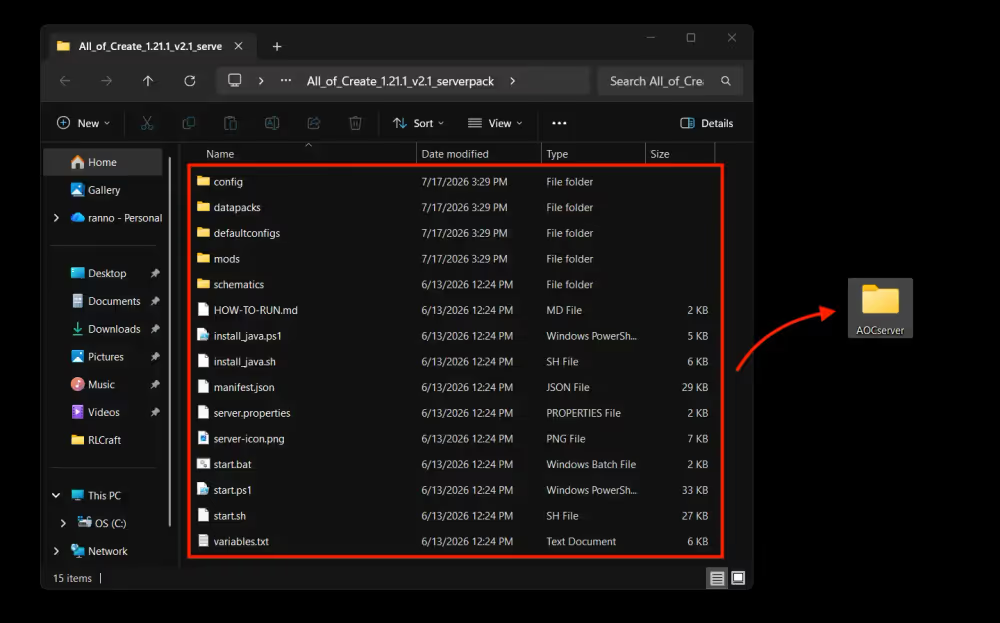
Find the right server version
If you need to install a specific version head to the All of Create: Aeronautics page on the CurseForge app and open the versions tab. Click on the "Download server pack" button.
Note down the exact version number. Every player needs to run the same version on their client.
2. Install your All of Create: Aeronautics server
Run the installer
Double-click start.bat. A terminal window opens and asks if you want to proceed, Type "Yes" and the terminal begins downloading NeoForge and all required libraries. Leave it running until it finishes on its own.
Leave the terminal open. Closing it mid-download cuts the process short. If it stops before finishing, run start.bat again and it will pick up where it left off.
Java version compatibility
All of Create: Aeronautics runs on NeoForge for Minecraft 1.21.1, which requires Java 21 or higher. The terminal checks your java version and will download the correct version by itself.
If the terminal closes immediately after starting you might need to install java 21 manually and remove any other versions.
Accept the EULA
Once the download completes, the terminal stops and prompts you to accept Minecraft's End User License Agreement. Type I agree and press Enter. The server won't continue until you do. After accepting, the installation finishes automatically.
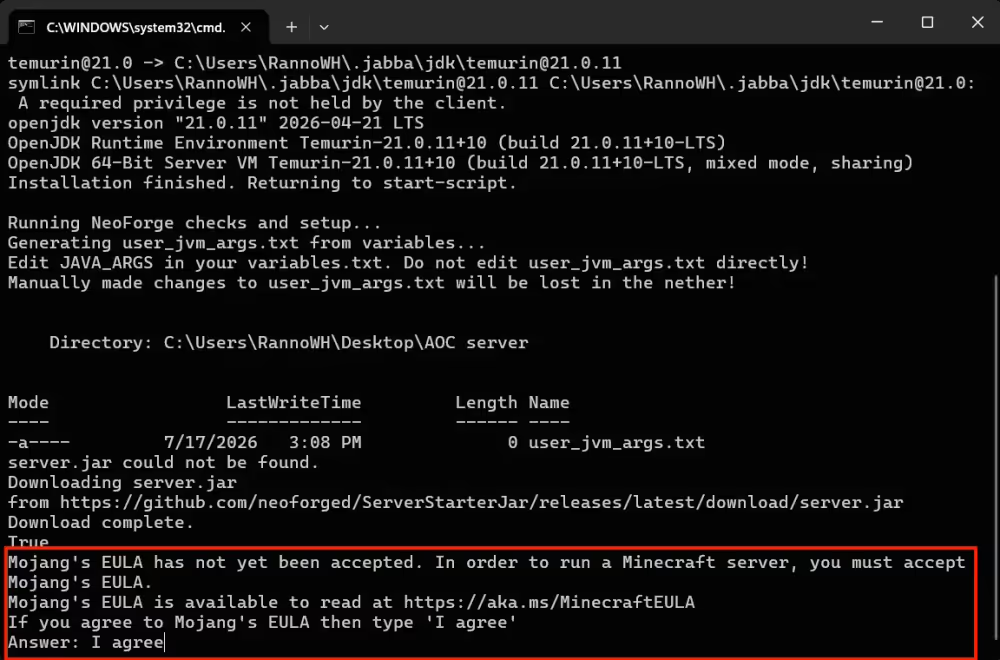
If a firewall pop-up asks for permission then allow it. This is needed so your friends can connect to the server after port forwarding.
3. Install All of Create: Aeronautics on your Minecraft client
Use the CurseForge app
Each player joining the server needs the modpack installed on their own machine:
- Open the CurseForge app
- Select Minecraft from the game list
- Search for All of Create: Aeronautics under Browse Modpacks
- Click Install
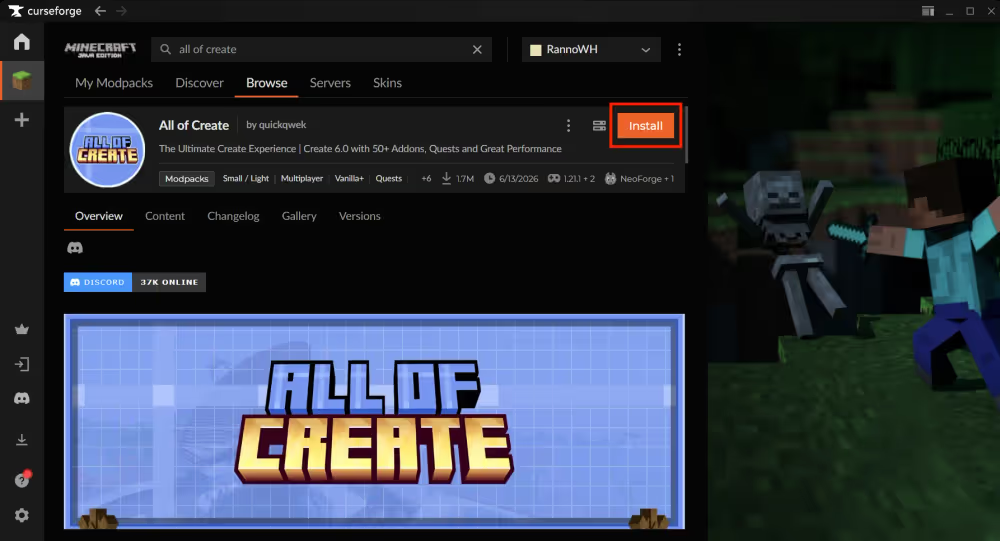
Match client and server versions
The modpack version on every player's client must match the server exactly. A mismatch produces a connection error on join. To check the client version, look at the badge in the top right corner of the modpack card on the My Modpacks page. To switch, click the three-dot menu on the modpack, select Change Version, and pick the version that matches the server.
4. How much RAM does an All of Create: Aeronautics server need?
Create mods put more load on the CPU than RAM, but with 50+ addons running simultaneously, RAM still needs proper allocation. Physics-based contraption simulation, automated machinery, and active airship movement all contribute to memory usage, especially with multiple players running their own builds at the same time. You can start at 6GB and scale up as the world grows or more players join.
All of Create: Aeronautics server RAM allocation:
| Players | Recommended RAM |
|---|---|
| 1–2 | 8GB |
| 3–6 | 10GB |
| 7–15 | 12GB |
These recommended figures give the server enough headroom to handle physics processing and chunk loading without dropping behind.
Your host PC needs memory on top of the server's allocation. Windows typically takes 4–6GB on its own. On a 16GB PC, 8GB is a practical ceiling for the server.
Allocate the right amount of RAM
Open user_jvm_args.txt in a text editor, find the # -Xmx line, and update it to your target. For 8GB:
-Xmx8G
Delete the hashtag in front of it, to make the line active.
5. Start the server and connect locally
Launch the server
Double-click start.bat. The terminal loads through the mods one by one. A successful startup has this message somewhere in the end:
[Server thread/INFO]: Done (Xs)! For help, type "help"
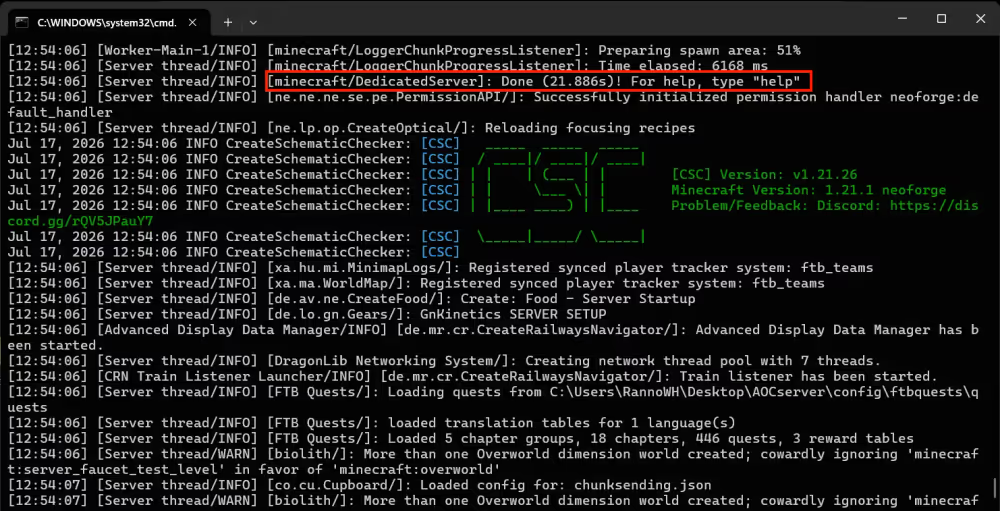
Startup time: The first boot takes a few minutes while NeoForge generates initial caches. Later starts are faster.
To stop the server: Type stop in the terminal and press Enter. This saves the world and shuts down safely. Closing the terminal window directly risks world corruption on the next launch.
Connect via localhost
Open Minecraft through the CurseForge app, go to Multiplayer, and click Add Server. Set the Server Address to localhost and click Done.
A successful connection means your Create: Aeronautics server is running locally. Time to build something that flies.
6. Configure your server settings
If you want to adjust game mode, view distance, difficulty, or other server behavior, open server.properties in your server folder with any text editor. Changes take effect the next time the server starts.
7. Open your server to the internet
Your server is local network only at this point. To let friends join from outside, you need to open the port Minecraft runs on.
What is port forwarding?
Your router blocks incoming connections by default. Port forwarding creates a rule that routes traffic on a specific port directly to your PC. Minecraft Java Edition uses port 25565 by default, which can be changed in server.properties under server-port if needed.
How to forward port 25565
The steps vary by router but follow the same general steps explained in this video:
portforward.com has router-specific walkthroughs for almost every model. Search yours there if the steps don't match what you're seeing.
Find your IP
Search "what's my IP" in Google to get your public IP address. Share it in this format:
123.45.67.89:25565
Final thoughts
All of Create: Aeronautics is one of the best-performing Create packs available and getting the server running is straightforward. Java 21, the server pack from CurseForge, enough RAM for contraption physics, and matching versions between client and server. Get those right and you're ready to take to the skies.
If you're a visual learner you can also follow the Wisecraft video guide: